Integration Test
This outlines pragmatic test cases for testing of beacon and geofence interactions during SDK integration. Beacons are powered by Bluetooth Low Energy (BLE) protocols in order to continually transmit a unique signal. Smartphones equipped with the Pulse iD SDK receive the signal then trigger interactions. Geofences use device location and pre-defined coordinate boundaries to trigger interactions. Interactions are configured using Pulse iD’s Platform to provide targeted, rich interactions with minimum battery consumption for in-the-moment, micro-location interactions and location intelligence.
App Installation
Install the Demo App or your Test App on your device
- The Demo App that comes along with the SDK is to be used as a reference point for testing and code examples.
Testing Tips
Follow these steps to ensure a consistent and accurate testing process:
-
Ensure Bluetooth and Location Services are enabled on the device
-
Ensure the phone is connected to the Internet. Notifications will not be displayed without an Internet connection
-
When using multiple beacons, physically separate them during testing to avoid confusion. The app will generally interact with the most powerful beacon signal – not necessarily the closest beacon.
-
Third party tools such as Locate Beacon can be used to determine all registered beacons in range of the mobile. A scanner tool is also available on Mac OS: Beacon Scanner
-
You will need to emulate an ‘exit event’ before the app will display another notification from the same beacon/location:
- Turn off bluetooth or move out of range of the beacon for 2-3 minutes before moving back in to range or turning on bluetooth.
- Move out of the geofence, or use a location emulator to change smartphone location.
-
Beacons and geofences can take up to 60 seconds to be detected by the app before an interaction is displayed
-
If additional locations or beacons are added to the app, it can take few hours for the app to become aware of them, depending on configuration:
- You can uninstall & reinstall the app to download the updated configuration
Test Process - Beacon
-
Install the Demo App or your Test App on the device
-
Activate Bluetooth and Location Services
-
Have the app running in the background
-
Place beacons in dispersed locations, at least 20m apart
- You can use the Locate Beacon to emulate a beacon
-
Move to within a 1 meter radius of the beacon
-
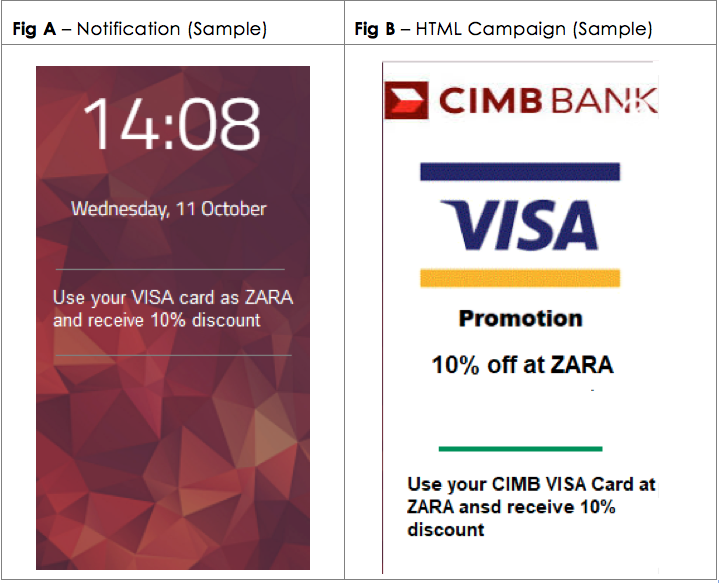
Notification should appear on device within 30-60 seconds (Fig A)
-
Click the notification to open an in-app web view html page (Fig B)
-
Verify it against the expected result
Test Process - Geofence
-
Install the Demo App or your Test App on the device
-
Activate Bluetooth and Location Services
-
Have the app running in the background
-
Navigate to a geofenced location
-
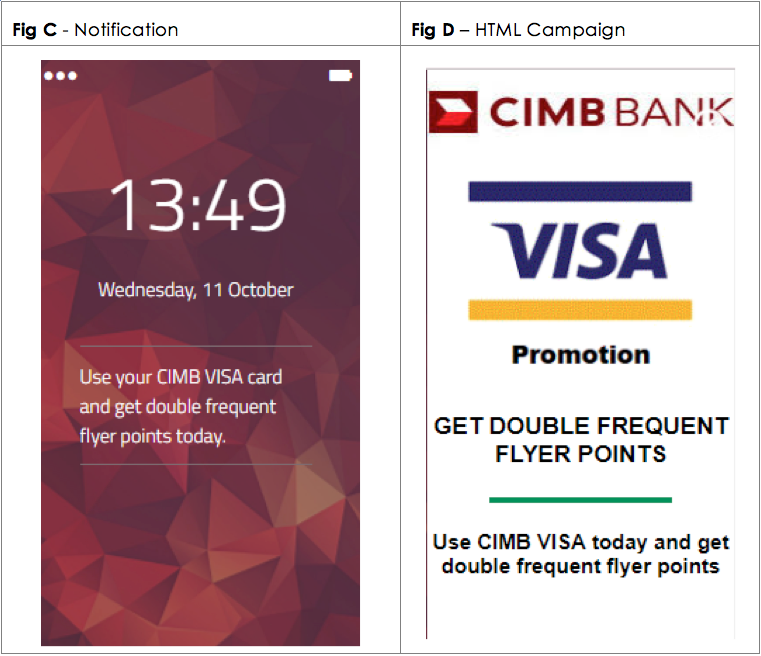
Notification should appear on device within 30-60 seconds (Fig C)
-
Click the notification to open an in-app web view html page (Fig D)
-
Verify it against the expected result
Testing using Xcode for iOS
This procedure is specific for testing iOS applications.
In order to test PulseID services, the geo location on the device must be set appropriately to receive the push message. It is often not practical to travel to various locations to test the push messages. This is where location emulator comes in handy. You can manually set the location of the device without physically having to going to the location.
Testing Steps
-
In Xcode, we need to define GPX file first
<wpt lat="-37.800582" lon="144.907554"> <name>Your Location</name> <time>2017-10-02T14:55:00Z</time> </wpt> -
Replace the lat,lon to the location.
- To simulate the location once the App is launched, you can specify it in Scheme (Run->Options->CoreLocation->Default Location).
- In order to jump to other locations whilst the App is running, you can click the location icon in Debug Area.