Quickstart
Pre-requisite
Please make sure you are familiar with the Catalyst Platform before using this quick start here.
Tip
Take a note of your Android app's key and the endpoint url, as you'll need them to initialize the SDK later.
Compatibility
The Pulse library works with Android 4.3.1(API 18) to Android 8.1 (API 27) and with devices equipped with Bluetooth 4.0 or higher.
Integration Example
Use this Demo Application as a reference implementation for the SDK. Refer to PulseSdkApplication.java and MainActivity.java files in the respository for use of examples shared in this guide.
Installation
Add Pulse SDK
Add Pulse repository to your project's build.gradle file.
repositories {
    ...
    maven {
        url "https://dl.bintray.com/pulseid/pulse-android"
    }
}
Add following to your module’s build.gradle file:
android {
    ...
    packagingOptions {
        exclude 'META-INF/DEPENDENCIES.txt'
        exclude 'META-INF/LICENSE.txt'
        exclude 'META-INF/NOTICE.txt'
        exclude 'META-INF/NOTICE'
        exclude 'META-INF/LICENSE'
        exclude 'META-INF/DEPENDENCIES'
        exclude 'META-INF/notice.txt'
        exclude 'META-INF/license.txt'
        exclude 'META-INF/dependencies.txt'
        exclude 'META-INF/LGPL2.1'
    }
}

dependencies {
    ...
    compile 'com.pulseid:pulse-sdk:3.2.0'
}
For build systems other than Gradle, please visit our Bintray page and click the Set me up! button to use other options.
Access
If you're unable to use the Maven repository, contact support@pulseid.com to get installation package and instructions.
Integration
Initialize the SDK
In your main application class initialize the SDK and keep a reference to it as shown in the example below:
package com.pulseid.app;

import android.app.Application;

import com.pulseid.sdk.PulseSdk;
import com.pulseid.sdk.PulseSdkConfig;

public class PulseSdkApplication extends Application {
    public static final String TAG = "PulseSdkApplication";

    private static final String APP_KEY = "YOUR_APP_KEY"; // TODO: Replace with your own!
    private static final String APP_URL = "YOUR_APP_URL"; // TODO: Replace with your own!

    private static PulseSdkApplication application;
    private PulseSdk pulseSdk;

    @Override
    public void onCreate() {
        super.onCreate();

        application = this;

        PulseSdkConfig config = new PulseSdkConfig(APP_KEY, APP_URL);
        pulseSdk = new PulseSdk(this, config);
    }

    @Override
    public void onTerminate() {
        super.onTerminate();
    }

    public static PulseSdkApplication getInstance(){
        return application;
    }

    public PulseSdk getPulseSdk() {
        return pulseSdk;
    }
}
Set the Session ID
The SDK relies on the session id parameter to uniquely identify a single user across multiple devices. This is optional. A valid session id is a 32 character hexadecimal string.
The custom session id needs to be set on the PulseSdkConfig class during initialization, as shown in the snippet bellow (based on the PulseSdkApplication example above):
@Override
public void onCreate() {
    super.onCreate();

    application = this;

    PulseSdkConfig config = new PulseSdkConfig(APP_KEY, APP_URL);
    String userId = SharedPreferenceHelper.getInstance(this).getUserId(); // Your app's custom user identifier
    config.setSessionId(userId);
    pulseSdk = new PulseSdk(this, config);
}
If your use case requires that you set the session id after the SDK has been started, use the updateSessionId instance method on the PulseSdk class.
Notification Appearance
The Pulse SDK notification has five primary content elements:
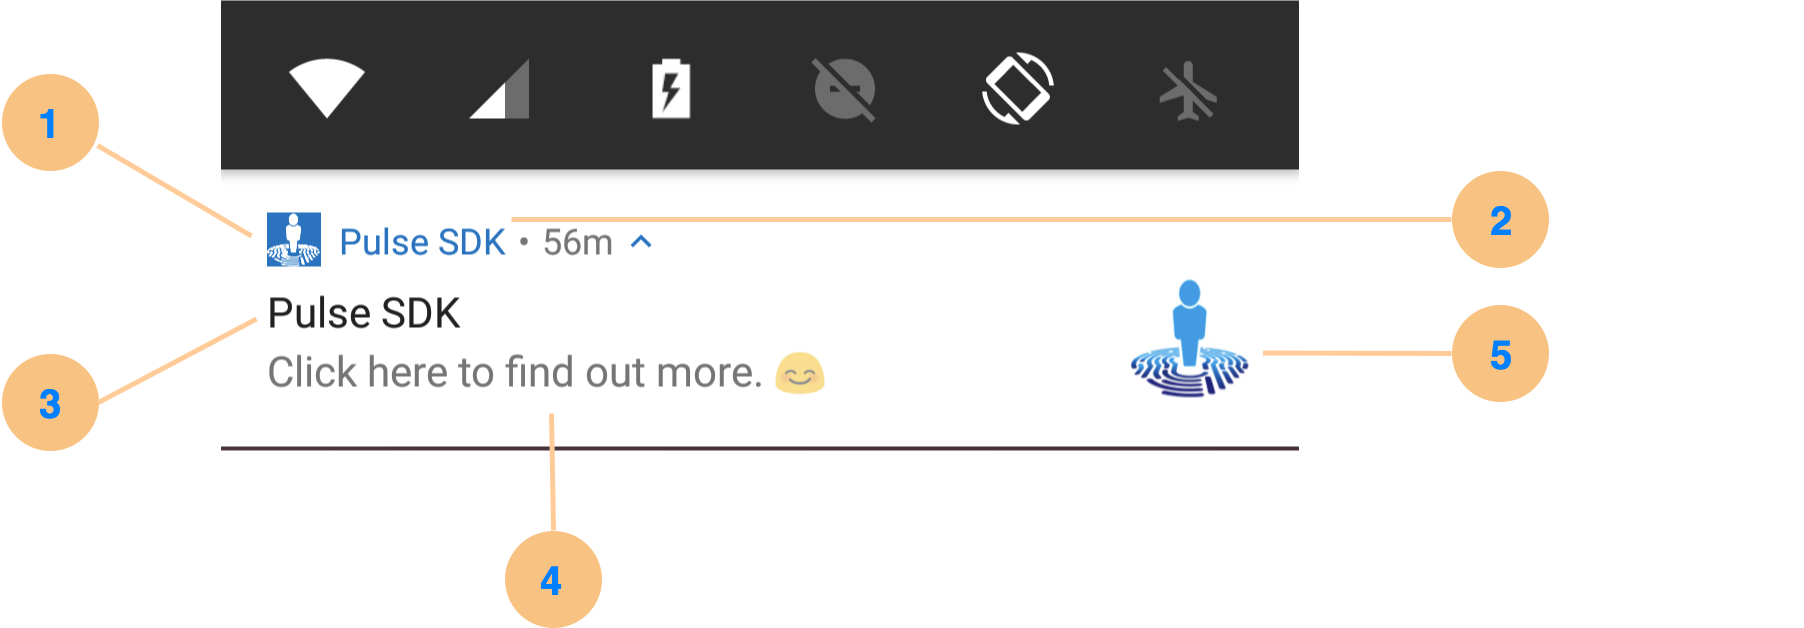
| No. | Content | Description |
|---|---|---|
| 1 | Small Icon | Mandatory small icon.Background color is transparent by default |
| 2 | App Name | Set by the operating system |
| 3 | Notification Title | Set by the operating system |
| 4 | Notification Content | As set during the creation of the campaign |
| 5 | Large Icon | Optional, large icon to be associated with each notification. None by default |
Instructions to customize the notification appearance are below. Also refer to Android Notifications Design Guide regarding the notification design.
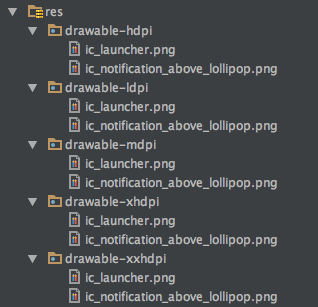
Small Icon
Warning
If the Small Icon is not set properly the SDK will not serve notifications.
The SDK will look for an icon named: ic_notification_above_lollipop.png in the drawable folders (drawable-hdpi, drawable-xhdpi, and etc.).
| Example | Folder |
|---|---|
Refer to the demo app res folder for an example. |
 |
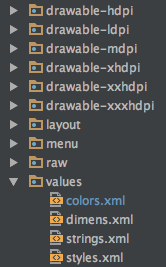
Background Color
Optionally, you can also customize the background color of the notification icon by adding the following property to the colors.xml file in the application project:
<color name="notification_icon_bg_color_above_lollipop">YOUR_COLOR_CODE</color>
| Example | Folder |
|---|---|
Refer to the demo app's res/values folder for an example. |
 |
Large Icon
Optionally, you can provide an icon named: ic_notification_large_icon.png along side/in the same folders as the small icon and it will be used with every notification that the SDK displays to the users.
Start the SDK
Starting the SDK usually consists of two steps:
- Ask the user for location permission
- Call SDK's
startmethod
Both of these steps should be implemented in your main activity, as shown in the example below:
package com.pulseid.app;

import android.Manifest;
import android.content.pm.PackageManager;
import android.os.Bundle;
import android.support.annotation.NonNull;
import android.support.v4.app.ActivityCompat;
import android.support.v7.app.AppCompatActivity;
import android.util.Log;

import com.pulseid.sdk.PulseSdk;

import static android.Manifest.permission.ACCESS_FINE_LOCATION;

public class MainActivity extends AppCompatActivity {
    private static final String TAG = "MainActivity";
    public static final int REQUEST_PERMISSIONS_REQUEST_CODE = 42;

    private PulseSdk pulseSdk;

    @Override
    protected void onCreate(Bundle savedInstanceState) {
        super.onCreate(savedInstanceState);

        pulseSdk = PulseSdkApplication.getInstance().getPulseSdk();

        //Step #1: Request user permissions

        //If the Build.OS is above Android L then permission granted will be false and requestpermissions() will execute
        // otherwise the SDK will start as permissions are already granted for Android L or below
        if (ActivityCompat.checkSelfPermission(this, ACCESS_FINE_LOCATION) != PackageManager.PERMISSION_GRANTED) {
            requestPermissions();
        } else {
            pulseSdk.start(MainActivity.this);
        }
    }

    private void requestPermissions() {
        ActivityCompat.requestPermissions(MainActivity.this,
                new String[]{Manifest.permission.ACCESS_FINE_LOCATION},
                REQUEST_PERMISSIONS_REQUEST_CODE);
    }


    @Override
    public void onRequestPermissionsResult(int requestCode, @NonNull String[] permissions,
                                           @NonNull int[] grantResults) {
        if (requestCode == REQUEST_PERMISSIONS_REQUEST_CODE) {
            if (grantResults.length <= 0) {
                Log.i(TAG, "User interaction was cancelled.");
            } else if (grantResults[0] == PackageManager.PERMISSION_GRANTED) {
                Log.i(TAG, "Permission granted.");
                //Step #2: Start the SDK
                pulseSdk.start();
            } else {
                Log.i(TAG, "Permission denied");
            }
        }
    }
}
Next Steps
Integration Tests
Refer to integration test guide to verify that SDK integration is working correctly.
Stop the SDK
Pulse iD interactions can be force stopped if required. This feature can be used to implement custom user controls within the app to allow users to opt-in/out of using Pulse-powered features.
Use the instance method stop() on the PulseSdk class.
Warning
Due to the async nature of the SDK it might take up to one minute for it completely stop. See the Lifecycle Events section, if you want to listen to this event.
Deep Linking
If are deploying deep linking Campaigns, please refer to these integration steps.
Set Segments
If you are targetting specific audiences using segment based Campaigns, please refer to the addSegments method to pass the relevant information from the app to the Catalyst Platform for targetting.